Continuous delivered Dockers via Codeship + Elastic Beanstalk
with tags docker codeship ci cd aws elasticbeanstalk -At Takumi we recently started deploying immutable pre-built docker containers through our CI system, onto our AWS Elastic Beanstalk nodes, while keeping the deployment procedure as simple as:
takumi-server (feature-branch) $ git commit -m "Important feature"
[feature-branch cf7edb2] Important feature
takumi-server (feature-branch) $ git push origin feature-branch
… wait for codeship build
takumi-server (feature-branch) $ cd ../takumi-deployment
takumi-deployment (master) $ dpl deploy takumi-server git_cf7edb2 takumi-server-dev
Deploying 'takumi-server:git_cf7edb2' to 'takumi-server-dev'
...
We’ve been using AWS Elastic Beanstalk for our different app environments for a variety of reasons. Most importantly EB solves a lot of problems straight out of the box, with minimal effort and a low learning curve for most developers:
- Autoscale groups + ELB for scale and redundancy
- Deploy git commits and branches with easy CLI commands
- Easy to recreate and redeploy variations of environments
However we’ve run into our fair share of niggling little issues, some of which we’ve already solved, some which we are in the process of solving and finally some which we won’t bother trying to solve. The world is changing fast and I believe we’ll be running on top of some container scheduler, maybe ECS, but more likely Kubernetes, before the end of the year.
In this blog post I’m going to describe how and why we decided to start
deploying pre-built dockers, which we build with Codeship and push to our
ECR repositories, and deploy using a tool built around generating Dockerrun.aws.json
files based on extremely simple templates.
Why ?
Why deploy dockers, and why pre-build them? In short, building and deploying docker containers allows you to quickly and reliably build an image containing all system dependencies and static configuration which can be tested and then deployed via a registry to multiple app servers.
Sounds pretty great, right? But I need to explain how the historical Docker support in Elastic Beanstalk has functioned. We’ve been using it for a while for our web app, and it basically works like this:
If you set your EB environment type to one of the Docker types, and a
Dockerfile is found in your project root, then upon deployment EB will
run something akin to:
$ docker build -t aws_beanstalk/staging-app .
$ docker run -d aws_beanstalk/staging-app
In addition to this, EB will inspect the newly started docker and generate
an upstream configuration file for nginx, pointing to the local docker and
the port defined by it’s EXPOSE line:
$ cat elasticbeanstalk-nginx-docker-upstream.conf
upstream docker {
	server 172.17.0.5:5000;
	keepalive 256;
}
This of course negates one of the major benefits of using dockers: building once, and running anywhere. If you have more than one app server, each one will perform the build steps by themselves, not only wasting resources by doing identical work, but also introducing the possibility for temporal build issues affecting some nodes but not others, resulting in an inconsistent build running on “identical” nodes.
In my opinion one of the main reasons to use Docker in production is to build once, run tests on the built artifact, and once deemed safe for deployment that same tested “binary” is rolled out to the different app servers. If your backend is written in C++, Go or Java, you might find this pointless as you’re used to being able to statically link a large binary or release a fully self- contained jar. However in Python, Ruby, and NodeJS things aren’t quite so peachy. Builds are slow, rely on remote and possibly fragile package repositories, which always means builds are slow, and sometimes inconsistent!
In our case this pattern of building on each node meant that we were basically overprovisioned rather dramatically to speed up deployments and replacement nodes. Elastic Beanstalk takes care of utilizing local package caches so that subsequent builds get faster as long as there are no major changes in environment or dependencies. Even so we faced harrowing 30+ minute build times when spinning up new nodes, and deploying reasonable changes could take several minutes per machine, and did I mention we were overprovisioned? Between deployments our machines would be 90-99% idle, no joke!
How ?
So in order to build once and deploy that same tested artifact, what do you need?
- Configure your CI system to build a docker image and run your tests inside the docker, and if you have external integration test scripts to run them against a running container instance of your image.
- A docker registry or repository to store tagged versions of your images.
We decided to use ECR (Elastic Container Registry) because since January
16th they are natively supported by Elastic Beanstalk. We tag all of our
builds with the githash (accessible as
$CI_COMMIT_IDfrom within codeship containers). - Only push and tag container images which pass tests, appropriately for
deployment or use further in your pipeline. We chose not to push any failing
containers to ECR. That’s easy using Codeship’s
codeship-steps.yml. - Finally you need a tool which allows you to reliably tell a particular
app environment that it should now run the image that you want. We custom
built a little tool which uses
git,awsebcliandboto3to deploy a container with a specific tag, to a specific environment.
Rough diagram of our setup
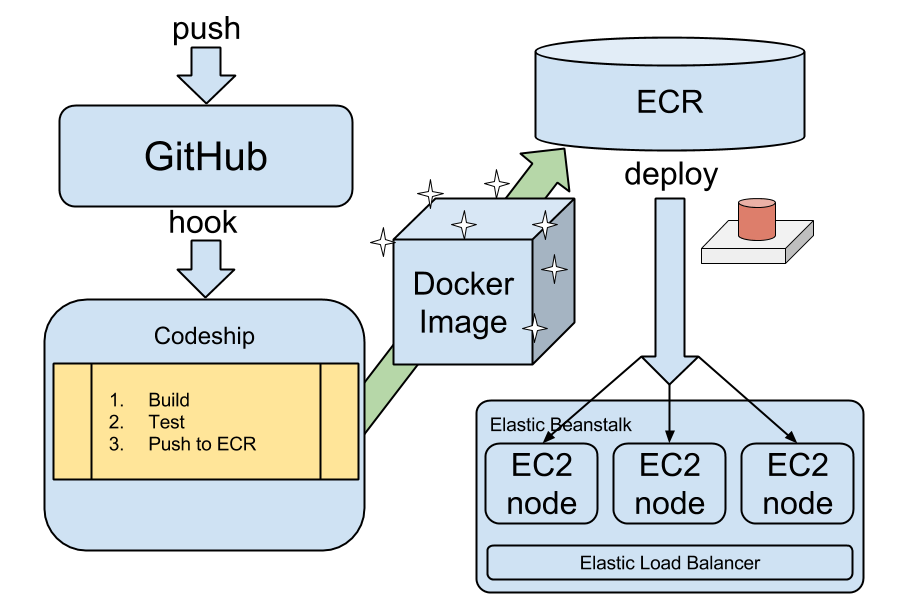
The tool we built for step 4 (represented by a big red button in the image above) is relatively trivial to make, the first working version took a few hours and within a couple of days we had polished off the rough edges of our first cut. It basically performs the following steps:
- Verifies that a docker with the given tag exist in ECR
- Verifies that the EB app and environment exist
- Generates a
Dockerrun.aws.jsonspecifying the given docker tag - Stages it for commit
- Deploys the current project to the specified EB app and environment using
--staged.
(venv) $ dpl deploy takumi-server git_$GITHASH takumi-server-dev
Deploying 'takumi-server:git_$GITHASH' to 'takumi-srv-dev'
...
Codeship Settings
If you have a Docker CI project setup with Codeship, you need to define two
files: codeship-services.yml and codeship-steps.yml. The first one
defines a set of services, at least one of which should be based on your
application. Other services we define are a postgres service based on
a standard postgres image (our integration test suite requires postgres),
a dockercfg service which we use to authenticate against our docker
registry (ECR), and finally a deployment docker which we built around our
tool described in item 4 in the How section here above.
codeship-steps.yml
app:
  build:
    image: <our-aws-account-id>.dkr.ecr.us-east-1.amazonaws.com/takumi-server
    dockerfile_path: ./Dockerfile
  dockercfg_service: aws_generator
  links:
    - postgres
aws_generator:
  image: codeship/aws-ecr-dockercfg-generator
  encrypted_env_file: aws_creds.encrypted # contains Secret, AccessKey and Region
  add_docker: true
postgres:
  image: postgres:9.4
deployment:
  image: <our-aws-account-id>.dkr.ecr.us-east-1.amazonaws.com/utilities:deployment
  encrypted_env_file: aws_creds.encrypted
  dockercfg_service: aws_generator
Those of you familiar with docker-compose might be familiar with the directives
here, because they
are related.
Now to use these services you need to define your build steps:
codeship-steps.yml
- type: serial
  name: continuous delivery
  steps:
    - name: test
      service: app
      command: make docker_test
    - name: push docker
      steps:
      - name: with githash
        type: push
        service: app
        registry: https://<our-aws-account-id>.dkr.ecr.us-east-1.amazonaws.com
        image_name: <our-aws-account-id>.dkr.ecr.us-east-1.amazonaws.com/takumi-server
        image_tag: git_{{ .CommitID }}
    - name: deployment
      service: deployment
      command: takumi-server git_{{ .CommitID }} takumi-srv-dev
      tag: master
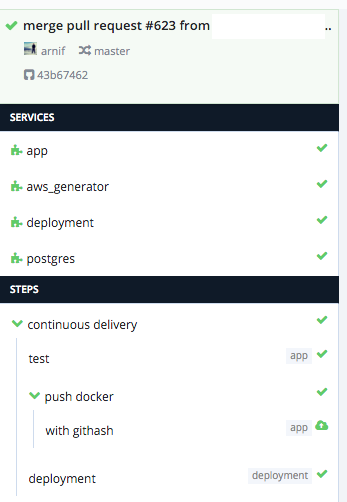
In our steps file we have three steps: test, which starts a docker based on
the app service with the command make docker_test. Our Makefile has a
target which runs the tests with the appropriate configuration for a docker
which is linked to another docker named postgres. Our second step is called
push docker and it specifies how to tag and push the docker built by our
app service. Finally we have a deployment step which runs an instance of
our deployment service, with the command required to trigger a deployment.
Pull request merged to master and deployed to dev
Developing Steps
When developing these steps I found that Codeship’s Jet tool was very helpful. Otherwise be prepared for a lot of commits and pushes to GitHub to trigger builds which fail after a few minutes. Installing Jet and being able to execute the steps locally and figure out any errors in our step or service definitions within a seconds was a huge help:
$ jet steps
...
Deployment Step
The deployment step specifies tag: master which means it should only execute
for our master branch. Personally I wish Codeship would have named this
directive branch instead of tag. That would have been more intuitive for
our use case, since dockers already have their own tags. The directive however
works for git tags as well, so that explains the name.
Since the steps are serial, as specified at the top of the document, each
step only executes if the previous step was succesful. For our deployments
we built a docker around the deployment tool described above, with a helper
script as an entrypoint which prepends dpl deploy.
Further Reading
If you’re interested in a more complete overview of the technologies mentioned here, here are some helpful links: